Showing posts with label crafts. Show all posts

Friday, August 12, 2011

Feeling Creative

A few days ago I wrote about my addiction to Pintrest and how awesome it is but this site is changing my life. All of a sudden I have this immense amount of information and images of projects and parties and design and decorating and architecture and style and just color and texture. And with it comes this extremely effective way to organize all this information and keep track of these things with very little effort. I'm feeling so inspired in regards to everything. I want to make stationery, throw endless parties, paint, wear my hair in something other than a messy bun, I want to design a whole entire house and decorate every single corner of it. I want to visit Spain and Greece and Italy. And I all of a sudden have such a passion for all of these things.

If I were the kind of person who flit from thing to thing I would feel excited right now but also know this was likely a phase. Instead I feel a genuine change happening. Trust me, I realize how silly this sounds, but I'm starting to picture myself gardening or buying a house or...building things. It's crazy.

These are some of the things inspiring me right now but really, it's just a tip of the iceberg.


Tuesday, May 3, 2011

April Showers Bring May Flowers

Remember how I said I was going to cover every spare bit of wall space in my apartment with some sort of art? Well, progress has been made.

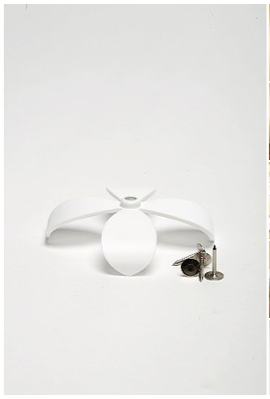
I've been staring at these flowers on the Urban Outfitters site forever. There's something I like about them but then every time I look at them I decide they're actually sort of dumb and not worth the $40 they cost. Then I'm drawn back and go through the whole thing again. Until all of a sudden it occurred to me that I could paint them.


I went to the craft store and bought a bunch of acrylic craft paint, the kind that's sold near all the unfinished wooden things you can paint, and some cheap brushes. I didn't really have a plan but I started by painting the backsides of the flowers. I left those to dry and came back the next day to do the fronts. I can be impatient so I was pretty stoked that this paint on this material dried really quickly.

Next I had to put them on the wall. The kit comes with these tacks and you basically just hammer them into a wall then snap the back of the flowers on. Not using a hammer is not an option, they aren't like thumbtacks, and you'll likely bend some of them. The kit comes with one extra pin but that wasn't enough to make up for the four tacks I ruined so I ended up super gluing a few to the wall. For those familiar with my past home projects this won't be a surprise. I also have a chandelier super glued to my ceiling and small rugs super glued together to create a large one.

Trust me, it's not as ridiculous as it sounds. And no, the chandelier is not going to fall down.


At this point I had super glued flowers to the walls, had a more than a few plaster mishaps being hidden by flower petals, and figured I was already in for a repair and paint job when I leave my apartment so, why not just go for broke and paint leaves on the wall too?


I can't tell you how happy it makes me to round the corner in the morning and see this. Especially with the recent sun.

Monday, December 13, 2010

I'm pretty sure it's all the glitter involved that makes this my favorite holiday.

Lana and I wanted to do crafts on Thanksgiving but once it rolled around and everyone was together the boys didn't run away to watch football as we had predicted so we stuck around and all played games. But we had all this crafty stuff for a craft project and so we kept making half-hearted plans to make our crafts but instead watched Glee. Until this weekend when we decided we had better do these Christmas crafts before we'd have to wait a whole 'nother year.

Originally I'm not sure what we had in mind for a craft, or maybe we had nothing, but we ended up wandering Michael's one cold November day in search of a Christmas craft when we came upon these in the dollar bin.


I'm not really sure what they were intended for. They each have a hole in the top and come with a ring although I can't think of anything you'd want to do with these that would involve keeping them on a ring. Except maybe making flashcards. But the holes do make it possible to make a pretty awesome garland out of them. We stocked up on tree shapes, stars, and ornament shapes. And also pretty much everything else there. Especially all the sparkly things.


There was a lot of glitter involved.

These are my trees which I left to dry and will tie together with twine to make a garland.


This one has teeny tiny jingle bells on it.


I used to use a lot of letter stickers for something I can't even remember now but it's left me with sheets and sheets of letters that don't really spell anything so I put them to use.


Rhiiiiiiinestoooooones! I tried to type that the way Oprah talks.


This one is Lana's favorite because it looks like a quilt.


This was the first one I did and I definitely contemplated just making an entire garland of these but then the possibilities of other trees lured me in. I think I'm going to do some star garland in this style though and leave it up year round.


This one is my least favorite. I'm not really sure what I was going for so I just kept adding more stuff.


These are the stars that came from the pieces on the quilt style tree.


Little baby Scrabble tile sticker letters! I've had these forever and never do anything with them so this seemed as good a time as any to use them up.


This is my favorite one. When I did it I actually didn't have a ton of control over how it would turn out. I used a glittery puff paint to make the dots then poured little sprinkle heaps of glitter all over in different colors then at the end I just dumped it all off to see what happened.

Sunday, December 12, 2010

Super Rug

Remember when I posted about sewing the other day and I jokingly mentioned wanting to use glue except I wasn't really joking? Well get ready to think "Oh no she di'nt!" because I totally did.

Now before anyone gets all judgey I'm just going to throw out there that super glue is awesome, they even named it "super" glue which is probably an indication of how awesome it is or they would have named it "mediocre glue." Or maybe even "pretty good glue." But it isn't named either of those things is it? And it is super. I mean it dries quickly, it holds incredibly well, and there are about a jillion formulas that cater specifically to your glue needs. I'm pretty loyal to super glue after having used it to hang wall shelves three times and it totally working. And I didn't have to buy a drill so that just made it extra super.

Anyways, sewing was hard and took forever and I didn't want to do it again so I bought a bunch of super glue and decided to get to work.

I started with nine 2'x3' rugs that I previously mentioned purchasing at Urban Outfitters. Also eight bottles of this glue which is a gel, meaning it won't just soak into something porous like fabrics. It's also meant for high traffic areas or even outdoors so I knew it would likely stand up to being walked on. I just can't put my rugs in the dishwasher.


Javier decided to help which was nice of him. You can tell how helpful he was by the blur that his ears are.


I laid out the rugs just to sort of get a feel for it and to match up the lines. If you're going to try this yourself you're just going to kind of accept things aren't going to be perfect because these rugs varied slightly in size (not enough for it to really matter) and there's really no way you can match up the patterns. With a rug this busy though it's doubtful anyone will notice.


Javi approves.


So then I started gluing. I just put a thin line on the end of one rug and pressed the next one to it. It dried matte and clear.


I glued three rugs end to end three times to create strips of rug that I could then glue together.


Javi decided he was too sparkly for this nonsense so he ditched me.


This is the rug in it's finished state which I guess pretty much just looks like the picture where I laid them out but it's actually different.


I bought this no slip stuff at IKEA for under the rug. While it wasn't the exact size it's large enough to keep the rug in place and me from falling. Also it may be the only thing at IKEA with a name that makes sense.


Still a work in progress obviously but I think the fact that I have fairly contemporary furniture makes this rug a little less southwestern and actually ends up looking really cool.


So, the point of this whole thing was to not have to spend the amount of money that a rug this size would usually cost, plus to get a rug that isn't boring for that same lower price. I bought nine rugs for $18 each, eight tubes of glue for $3.50 each, and that thing from IKEA that was around $4. So in total this rug project cost me about $194 and took about two hours to complete. I have to say I'm completely satisfied with the results.